In this lab, students are introduced to necessary languages needed to develop Web GIS applications with the ArcGIS API for JavaScript. Basic methods and syntax of Hypertext Markup Language (HTML), cascading style sheets (CSS), and JavaScript, which are all commonly used in webpage development, will be introduced and used in this lab. HTML is the standard markup language for creating web pages and applications. CSS is a stylesheet language that describes the appearance of an HTML document. JavaScript is the scripting language for web pages. Using these three languages simultaneously, students will development a functional website.
This lab is divided up into four parts which include:
- Developing a web page using HTML tags
- Styling your web page using CSS
- Introduction to JavaScript
- Building a customized webpage
Methods
Part 1: Developing a web page using HTML tags
> Open a new Notepad++ program sheet
> Define the DOCTYPE, <head>, and <title> tags; the title should say "My Test Page"
> Next, set the <body> tag which should contain the following:
- Three levels of header that describe the website
- Your name, course, and semester
- Your UWEC department information
- Your hobbies
- Last date at which the web page was updated
- Credits for part of CSS and JavaScript codes that you will use in parts 2 and 3
> Insert a <body> tag underneath the closing </head> tag
> Insert an opening <div> tag with an id="header"; enter the following child levels of header (<h1> through <h3>) where <h2> should have your first and last name, course number, and semester; close the </div> tag after <h3> (Figure 1)
 |
| Figure 1: First block of HTML code |
> Start a new paragraph by entering a <p> tag and type the following in italics, "This is the result of my first HTML code"; create another <p> tag and type the following in bold, "These are my hobbies"
> Next, we will create an unordered list of hobbies; enter an unordered list opening tag <ul> right after the comment; list six of your own hobbies within the child list <li> item tag; close the </ul> tag after your list of hobbies; insert a closing </div> tag at the end of the list (Figure 2)
> Next, we will create an unordered list of hobbies; enter an unordered list opening tag <ul> right after the comment; list six of your own hobbies within the child list <li> item tag; close the </ul> tag after your list of hobbies; insert a closing </div> tag at the end of the list (Figure 2)
 |
| Figure 2: Second block of HTML code |
> After saving, create six non-breaking space paragraphs <p> </p> where a picture will be inserted in part 2
> Enter a <div> tag with an 'id' which will display the last date the website was updated; enter a final <div> tag with a footer 'id' which will display the credits and also a source reference link 'href' to Creative Commons website
> Finally, close the </body> tag and the </html> document (Figure 3)
 |
| Figure 3: Third block of HTML code |
 |
| Figure 4: Result of part 1 HTML code writing |
Part 2: Styling your web page using CSS
Section 1: Styling the various sections of a webpage
> We will now improve the display of the web page by styling it with CSS
> Open up a blank Notepad++ document; enter a comment on line 1 that says "Overall Design"
> Enter a body{ selector and give it 'background-color' and 'font-family' properties; close the body element with a '}' (Figure 5)
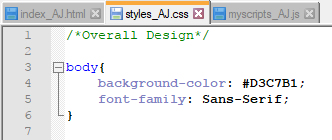 |
| Figure 5: First block of CSS code |
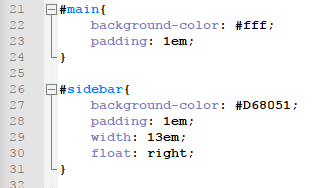
 |
| Figure 6: Second block of CSS code |
 |
| Figure 7: Third block of CSS code |
 |
| Figure 8: Fourth block of CSS code |
 |
| Figure 9: Fifth block of CSS code |
> For the stylesheet to work in the HTML page, we have to link the CSS file to the HTML document in the <head> tag; open the HTML file you created in part 1 and insert a <link> tag under the <title> tag and reference the 'styles_YourInitials' CSS file (Figure 10)
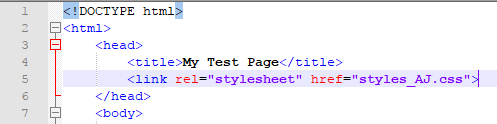 |
| Figure 10: Linking the CSS file to the HTML file |
| Figure 11: Formatting the <h3> tag |
 |
| Figure 12: <div id> for the wrapper and main in the HTML document |
Section 2: Adding forms to an HTML document
> In this section, students create a simple form along with a submit button to allow end-users of the webpage to be able to leave comments. A <form> tag is inserted with a simpleForm id in the HTML document. The form is labeled "Input" and a simpleSubmit id is inserted afterwards. The form is then closed with a </form> tag (Figure 13).
| Figure 13: HTML code for the simple form and submit button |
Part 3: Introduction to JavaScript
Results
Part 1: Developing Web Page Using HTML Tags
The resulting web page from part 1 can be viewed below (Figure 14). This web page is at its very basic form and has very little functionality and no styling.
 |
| Figure 14: Result from part 1 |
The results of incorporating CSS into the HTML page can be viewed below (Figure 15). The web page is still very basic with little functionality, but its appearance is much more attractive.
 |
| Figure 15: Result from part 2 |
The results of incorporating JavaScript into the HTML page can be viewed below (Figure 16). While it is still a simple HTML, it now has increased functionality and the end result looks much more attractive than it did after part 1.
 |
| Figure 16: Result from part 3 |
UWEC Website (logo):
University of Wisconsin-Eau Claire. (n.d.). Retrieved 2015, from http://www.uwec.edu/
Richardson, S. (n.d.). Girl Develop It. Retrieved 2015, from https://github.com/girldevelopit
No comments:
Post a Comment